Testing Strategies using Inky Web Export
Learn how to modify Inky’s “Export for web” output to mass test Ink scripts
Intro
Due to its ease and ubiquity, it is possible to develop complex testing systems for your Ink scripts with HTML and JavaScript. Inky supports exporting for the web; this feature outputs a folder with a web page, a stylesheet and some JavaScript files. We can use any text editor to modify these files so that the Ink scripts can be played using coded instructions instead of user events.
To get started, load up any Ink story and click File and run Export for Web. Pick a desired location and it should output a folder with the necessary files. For this document, I will be using a full story that comes with Inky called Crime Scene. You can access this from the Ink menu, Full Stories submenu.
Implementing Auto-Play
We can add some JavaScript to the exported main.js such that choices are automatically selected. This can help us play through our script without clicking anything. Open index.html in your favorite modern browser and open main.js in your favorite text editor. In main.js, scroll till you find the story.currentChoices.forEach function buried in the continueStory function. This forEach function is responsible for creating a button that the user can click on to make a choice. We will collect these buttons in an array and pick one at random and trigger its click event. At the end of the continueStory function, add the following:
	var choiceAnchors = []; // make an array to hold the buttons
	// Create HTML choices from ink choices
	story.currentChoices.forEach(function(choice) {
		// [existing code]
		// Click on choice
		var choiceAnchorEl = choiceParagraphElement.querySelectorAll("a")[0];
		choiceAnchorEl.addEventListener("click", function(event) {
		// [more existing code]
		});
		choiceAnchors.push(choiceAnchorEl); // store the button in the array
	});

// [Some scrolling code should be here]
// Only run the following code if buttons exist
if (choiceAnchors.length > 0)
{
	var randomIndex = Math.floor(Math.random() * choiceAnchors.length);
	choiceAnchors[randomIndex].click();
}
// end of continueStory function
After adding this and refreshing the loaded webpage, you should see the ink script “magically” play out. With the above script, the buttons are instantly clicked right after they are made.
If you want to see the choices, you can delay the click function call with
setTimeout, kinda like this:setTimeout(function() { choiceAnchors[randomIndex].click() }, 2000);
Once the story ends, we can click the restart button to re-run the Ink script and it will pick random choices to potentially generate a different play-through.
💻 Logging Info
With the help of console logging and browser inspector tools, we can spit out and view unique information. As a basic example, we can log which random choice was selected and other information about it.
if (choiceAnchors.length > 0)
{
	var randomIndex = Math.floor(Math.random() * choiceAnchors.length);
	var randomChoice = story.currentChoices[randomIndex];
	console.log( ["Choice: ",randomIndex, " - ", randomChoice.text, " @", randomChoice.pathStringOnChoice].join('') );
	choiceAnchors[randomIndex].click();
}
When you reload the webpage and open up your web browser’s developer tools (Ctrl + Shift + I on Firefox on Windows, for instance), you should see something like below in the Console window. You may need to tab over or adjust how the devtools are docked. Consult your browser’s documentation for more information.
Choice: 1 - The desk... @murder_scene.0.top.c-5
Choice: 2 - Look at the in-tray @murder_scene.0.top.c-5.11.deskstate.c-2
Choice: 3 - Something else? @murder_scene.0.top.c-5.11.deskstate.c-4
Choice: 0 - Turn on lamp @murder_scene.seen_light.0.c-0
Choice: 0 - The bed... @murder_scene.0.top.c-0
Choice: 0 - Lift the bedcover @murder_scene.0.top.c-0.9.bedhub.c-0
Choice: 2 - Test the bed @murder_scene.0.top.c-0.9.bedhub.c-4
Choice: 1 - Remake the bed @murder_scene.0.top.c-0.9.bedhub.c-3
Choice: 2 - Something else? @murder_scene.0.top.c-0.9.bedhub.c-6
Choice: 0 - The window... @murder_scene.0.top.c-7
Choice: 1 - Look at the glass @murder_scene.0.top.c-7.3.window_opts.c-1
Choice: 1 - Something else? @murder_scene.0.top.c-7.3.window_opts.c-4 2
Choice: 0 - Leave the room @murder_scene.0.top.c-8
Choice: 0 - 'Nothing.' @joe_in_hall.0.found.c-0
Multiple Runs in One Go
So we can click the restart button to start a new run but what if we didn’t want to. Well, we could check if the story has just ended and then invoke a restart, like this.
// Cannot continue + no choices = END
if (!story.canContinue && story.currentChoices.length < 1)
{
	restart();
}
However, doing this will expose many problems related to recursion. Basically adding restart to continueStory is dangerous because the restart function and the choice click function both run from continueStory while also calling it. Because restart can now run multiple times very quickly and trigger choices multiple times each run, we will quickly hit a “too much recursion” error and break our Ink runner.
What helps is to avoid calling functions directly by using setTimeout on the continueStory calls in the restart and choice-click functions.
		choiceAnchorEl.addEventListener("click", function(event) {
			// [existing code]
			// Aaand loop
			setTimeout(continueStory, 200); // 👈 add delay here
		});

	if (choiceAnchors.length > 0)
	{
		var randomIndex = Math.floor(Math.random() * choiceAnchors.length);
		var randomChoice = story.currentChoices[randomIndex];
		console.log( ["Choice: ",randomIndex, " - ", randomChoice.text, " @", randomChoice.pathStringOnChoice].join('') );
		choiceAnchors[randomIndex].click();
	}
	else if (!story.canContinue)
	{
		// If story ended, trigger the restart button (instead of calling restart)
		document.getElementById("rewind").click();
	}

function restart() {
	// [existing code]
	setTimeout( function() { continueStory(true); }, 300); // 👈 add delay here
	outerScrollContainer.scrollTo(0, 0);
}
The delays can be set to values as low as 1 ms, if speed is desired. I’ve found that disabling unnecessary code flows like saving and animation effects can be useful for these multi-run tests. It is definitely prudent to add an onError function to gracefully catch errors and stop testing.
var story = new inkjs.Story(storyContent);
story.onError = function (msg, type) {
	console.log("Captured:" type + " : " + msg);
}

function showAfter(delay, el) {
	// emptied, avoids transition delays
}

function scrollDown(previousBottomEdge) {
	// scroll without animation
	outerScrollContainer.scrollTo(0, previousBottomEdge);
}
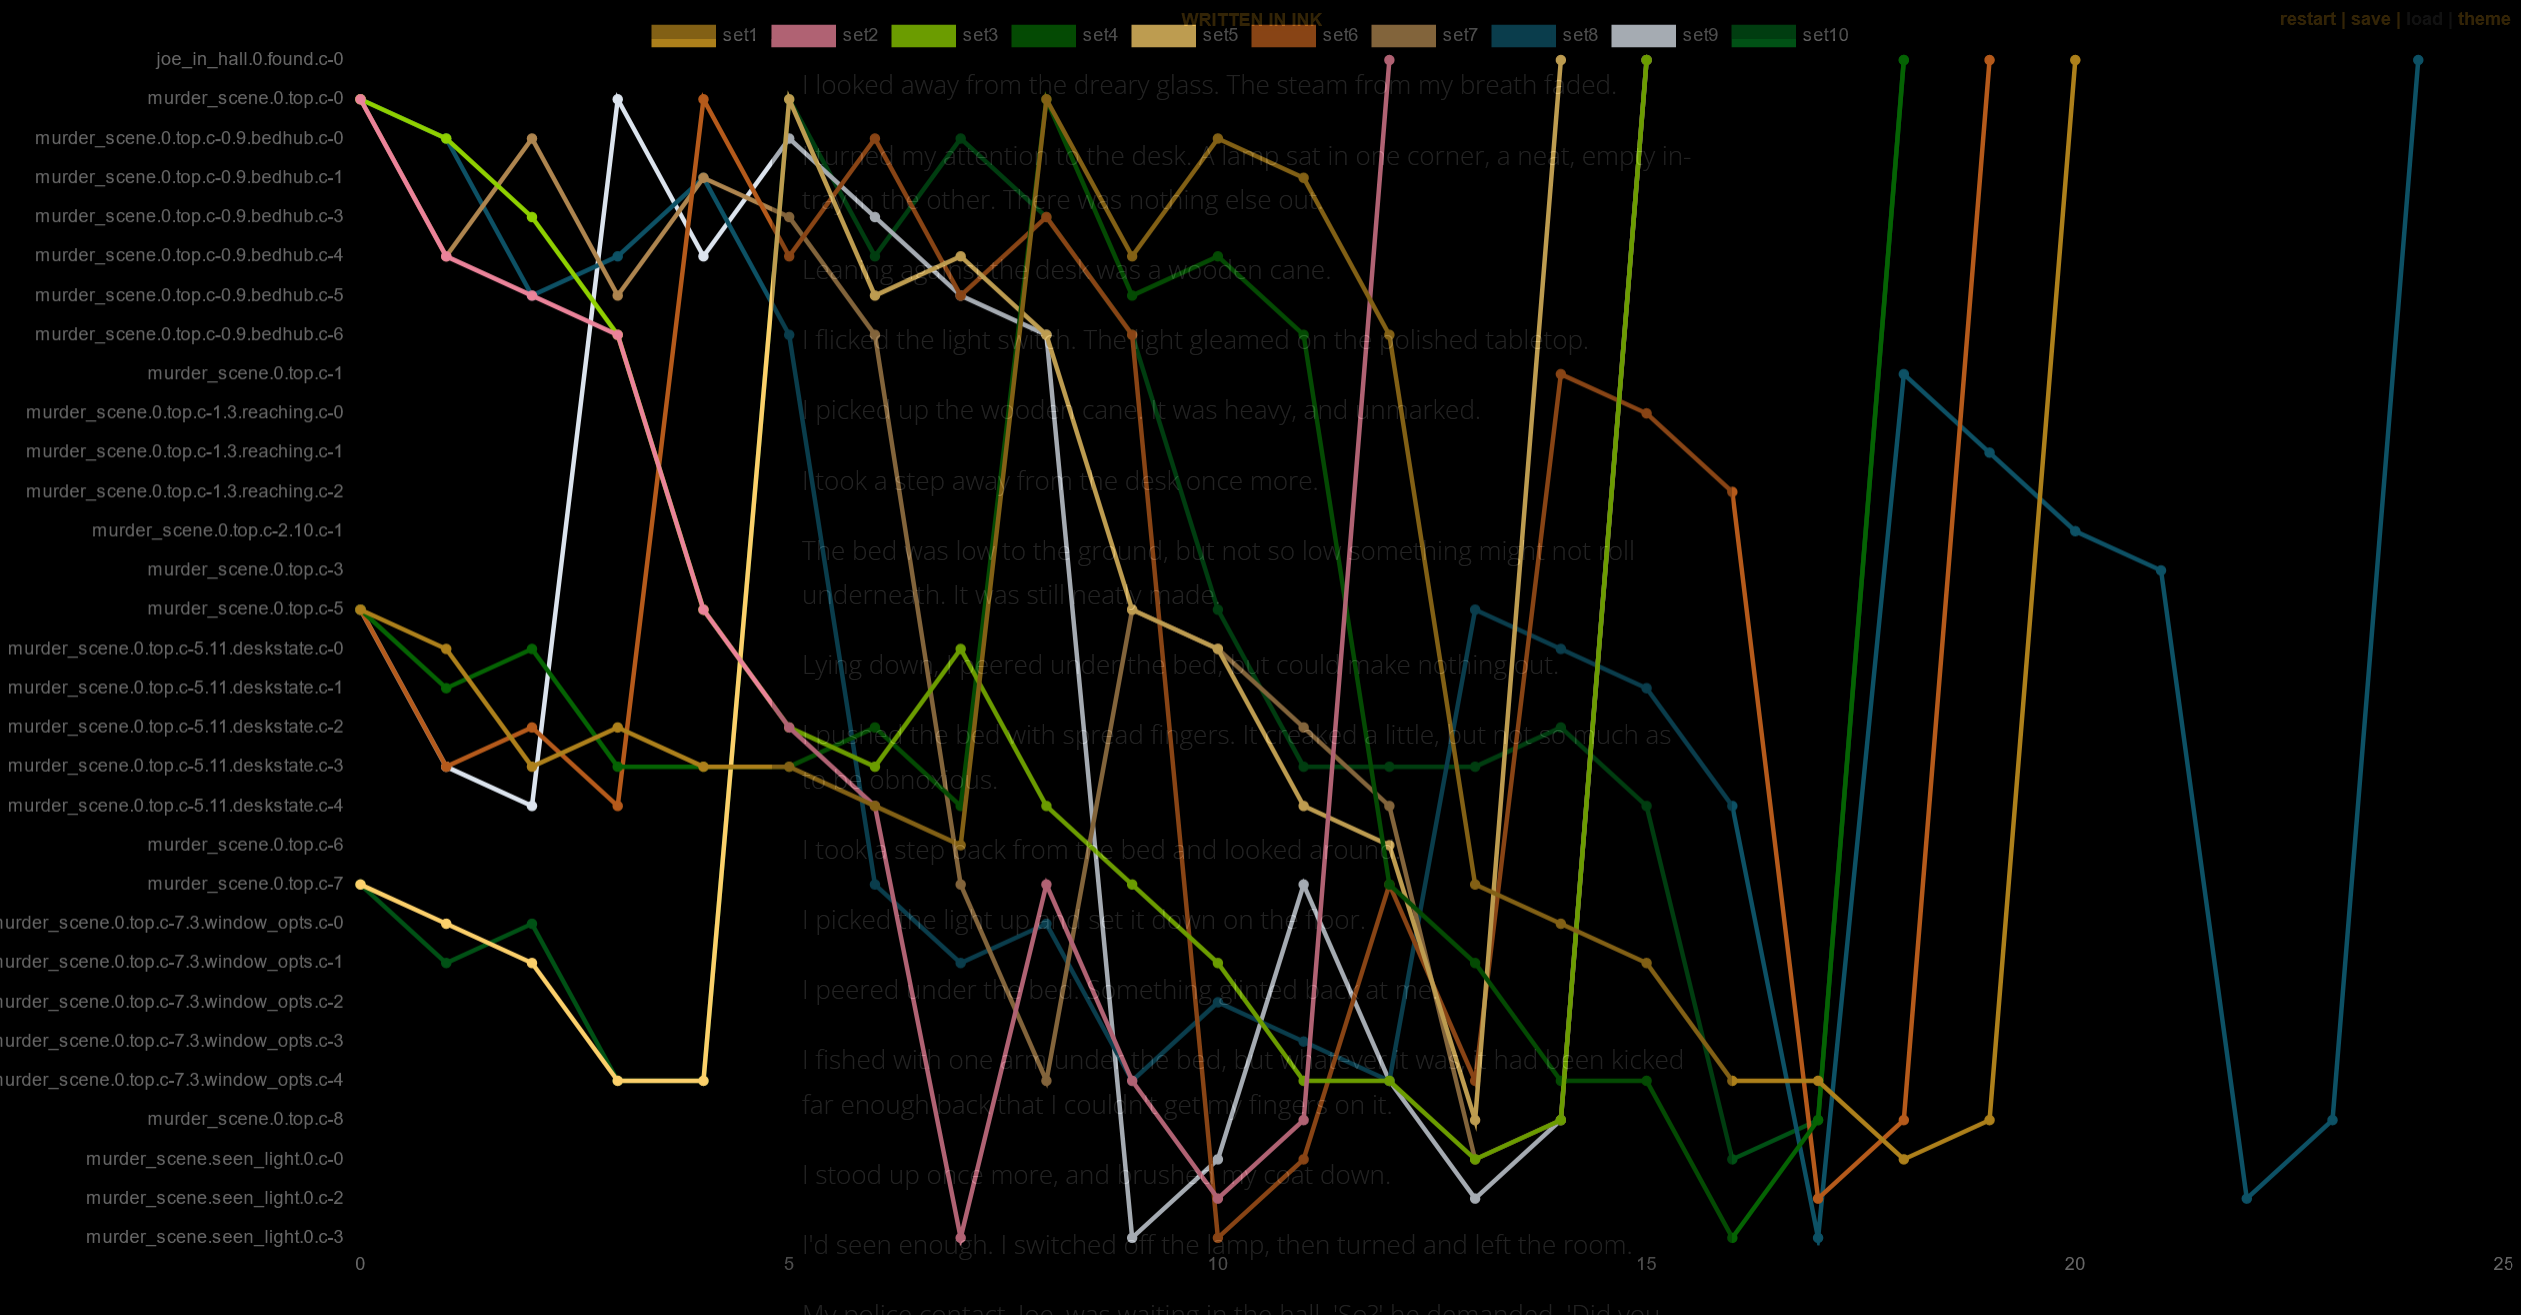
📈 Visualizing Run Data
While the Ink script auto-plays, we can collect all sorts of data and visualize them right in the browser. In the following example, we’ll collect the choices and display them using chart.js.
<!-- in the index.html header, add -->
<script src="https://cdn.jsdelivr.net/npm/chart.js"></script>
<!-- in the body, add at the top  -->
<div><canvas id="inkChart" /><div>
<!-- in the style.css, make the outerContainer transparent (to better see the chart) -->
.outerContainer {
	opacity: 0.25;
In the main.js, right after declaring the story variable, we’ll add code to draw the chart. Also, we’ll introduce a run counter so we can limit our runs and chart data.
	var desiredRuns = 10;
	var runCounter = 0;
	const ctx = document.getElementById('inkChart');
	var chart = new Chart(ctx, {
		type: 'line',
		data: { datasets: [] }, // datasets will be populated when story ends
		// x-axis is for choice counts, y is for choice path strings
		options: { scales: { x: { type: 'linear'}, y: { type: 'category' } } }
	  });
	var choices = []; // will hold the choices we make per run
Towards the end of the continueStory function where we added click and restart logic, we’ll collect the path info on click and use it to update the chart right before we restart a new run.
if (choiceAnchors.length > 0)
{
	var randomIndex = Math.floor(Math.random() * choiceAnchors.length);
	var randomChoice = story.currentChoices[randomIndex];
	console.log( ["Choice: ",randomIndex, " - ", randomChoice.text, " @", randomChoice.pathStringOnChoice].join('') );
	// push the path string into array, the index will represent the choice number
	choices.push( randomChoice.pathStringOnChoice );
	choiceAnchors[randomIndex].click();
}
else if (!story.canContinue)
{
	runCounter++;
	// Generate random color
	var color =  '#' + (0x1000000 + Math.random() * 0xffffff).toString(16).substr(1, 6);
	// Add a new dataset with the collected choices
	chart.data.datasets.push( {
		label:"set"+runCounter, // name this dataset based on the run count
		// build the data based off the choice count and the choice path string
		data:choices.map((choice, index) => ({ x: index, y: choice })),
		// assign the random colors
		backgroundColor: color, borderColor: color
	});
	// Sort the path names, this is optional ... I feel it helps view choice clusters
	chart.data.labels.sort( (a,b) => a.localeCompare(b) );
	// Update the chart
	chart.update();
	// Clear choices for the next run
	choices = [];
	// Restart only if necessary
	if (runCounter < desiredRuns)
		document.getElementById("rewind").click();
}
Running this in the browser will yield a dynamic series of line graphs. We can intepret these charts and draw some conclusions such as:
- how many choices a user could make
- how often a specific end is reached
- how much variation could a single choice offer
With more effort, we can make chart.js do other fancy things such as render responsively or fade out older specific datasets.
Conclusion
Thanks to Inky web export and some quick JavaScript hacks, we can stress test our Ink scripts and even collect and visualize its specific data. We can use this setup to find potential errors or study probabilities of exploring specific branches in our story.