Getting Started with InkCPP in Unreal
Learn how to get up and running with InkCPP for the Unreal Engine.
Preparation
In the following guide, we’ll assume the reader is proficient with Ink but not Unreal nor InkCPP.
To get started, ensure you have Unreal Engine installed through the Epic Games Launcher.
To use the InkCPP runtime, the InkCPP plugin is required. You can get it here. Once it is added to your account, you’ll need to it to the engine. In the Epic Games Launcher, go to the Unreal Engine’s Library, scroll down to Fab library, search for the plugin and install it to your desired Unreal Engine.
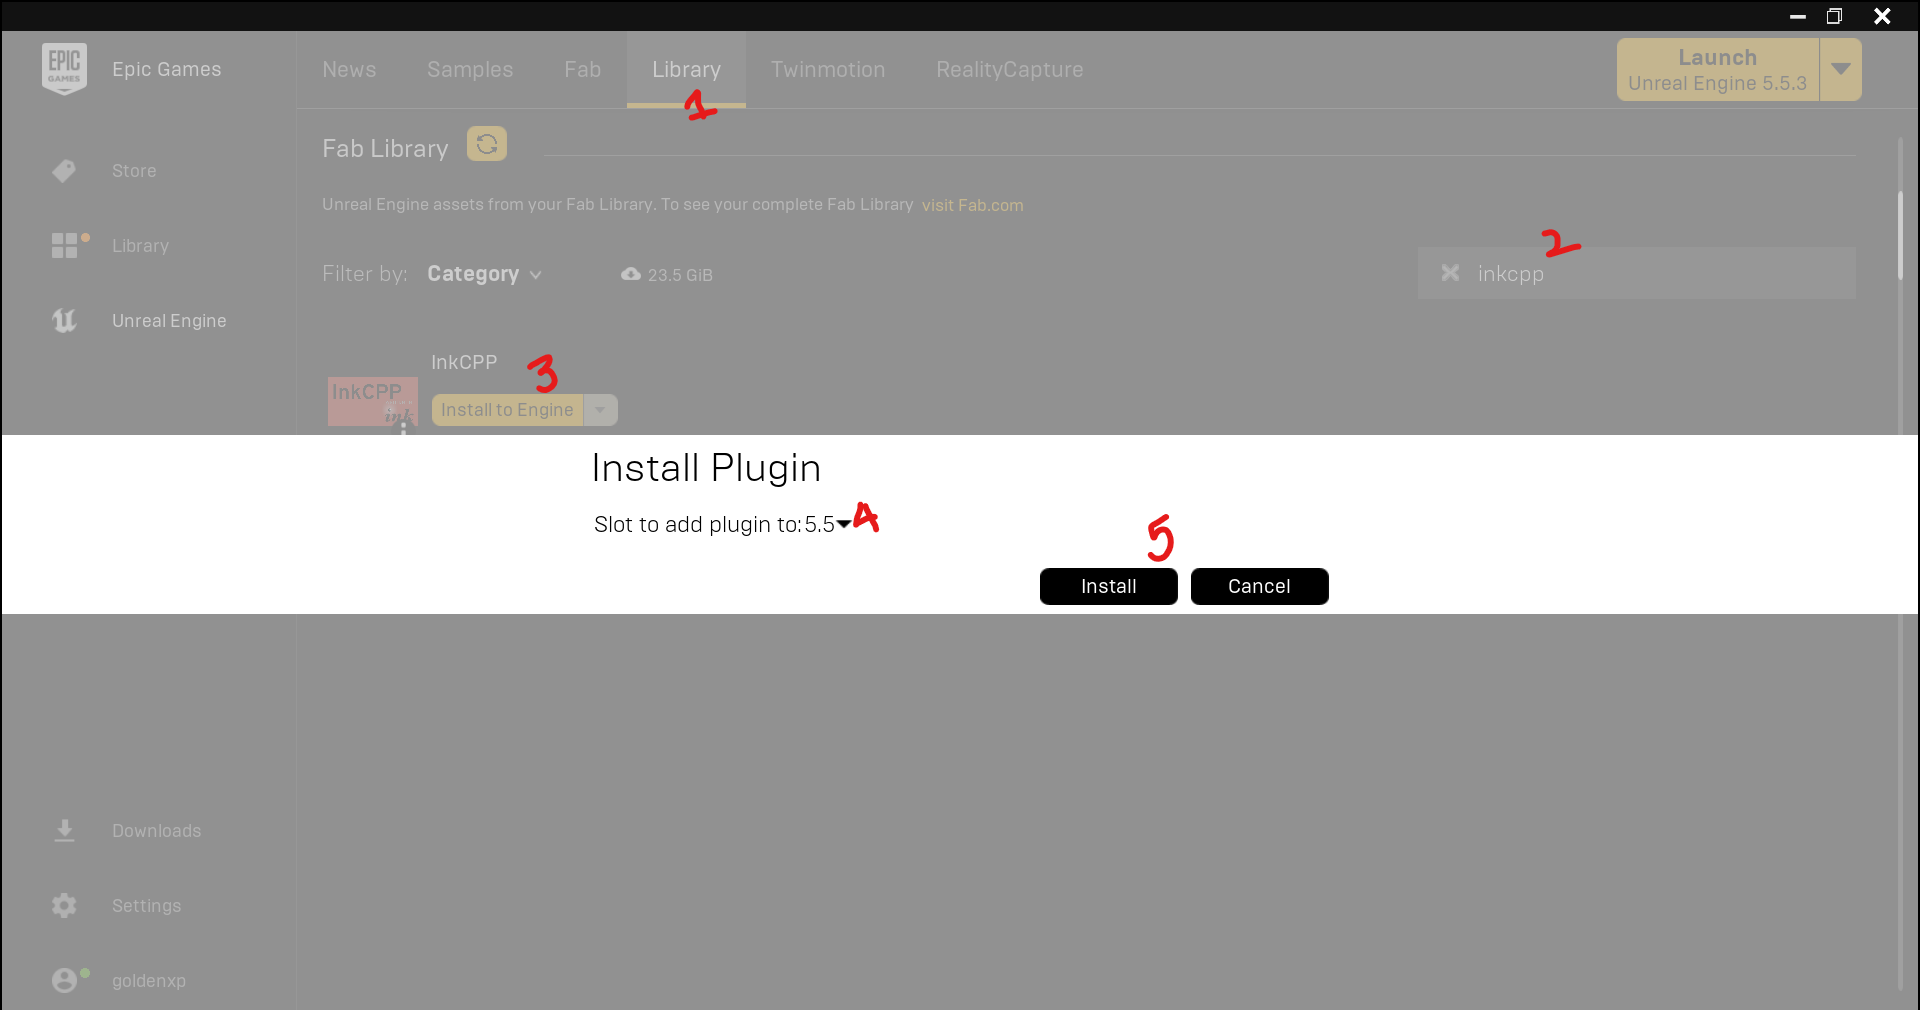
Launch the engine to which you installed the InkCPP plugin. If it’s your first time launching Unreal, it might ask you to install some pre-requisites and enable some permissions. This is normal so accept all of it to ensure a smooth Unreal experience.
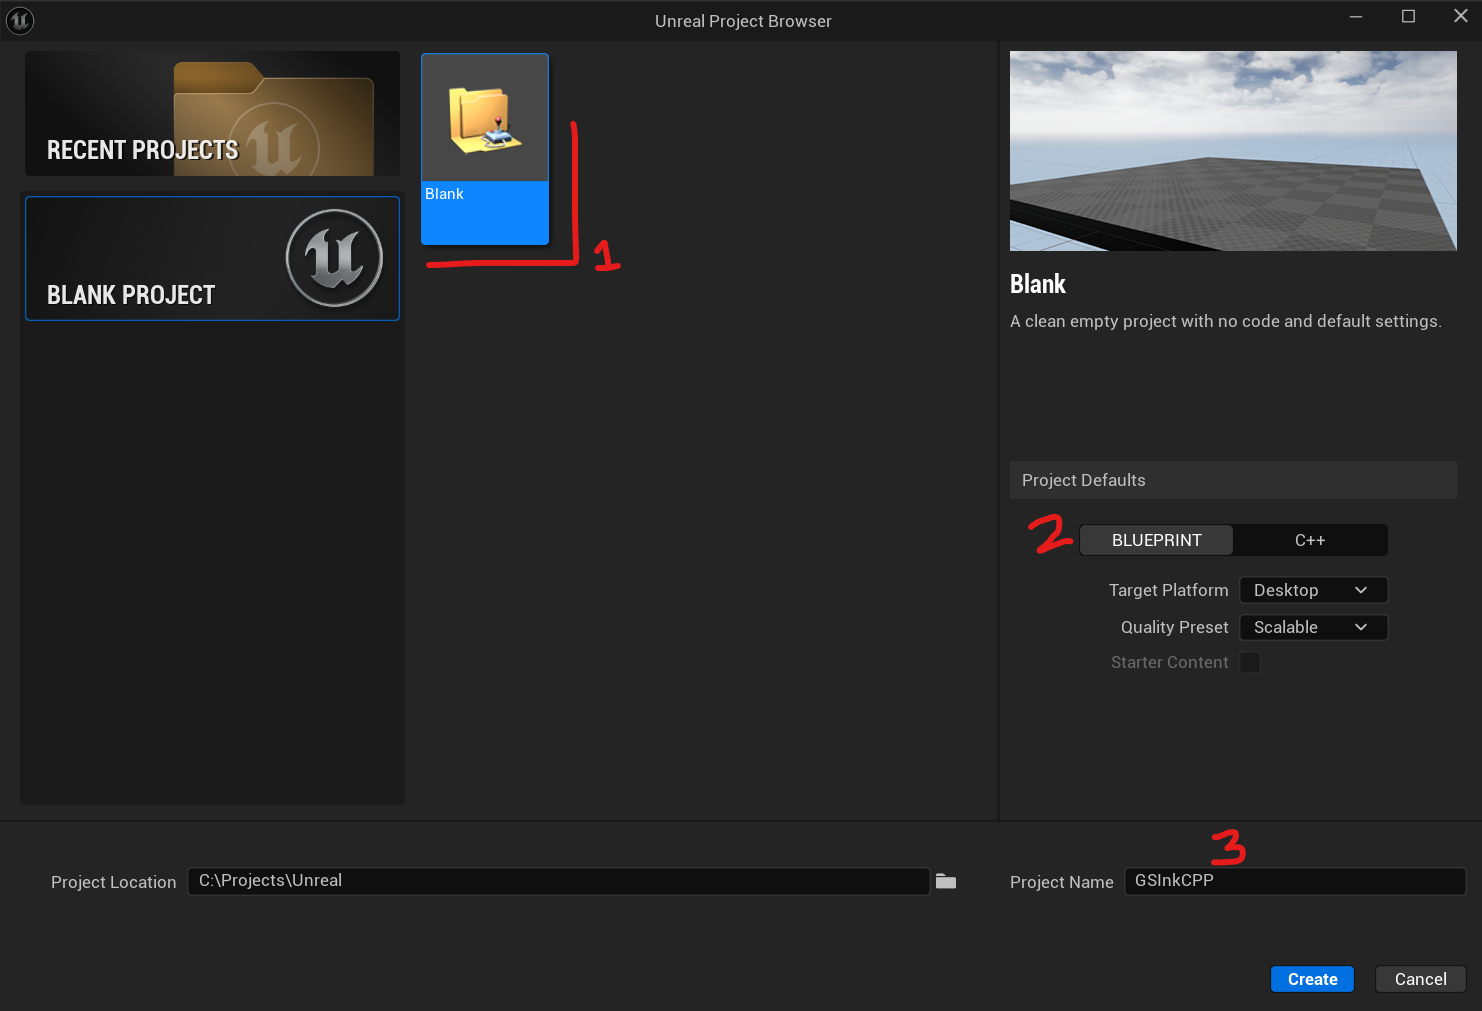
In the Unreal Project Browser, create a Blank Blueprint project. Give the project an appropriate name and set any other parameters as you wish. On creation, a simple level will be visible. At this point, we need to enable the InkCPP plugin; it’s installed but not enabled.
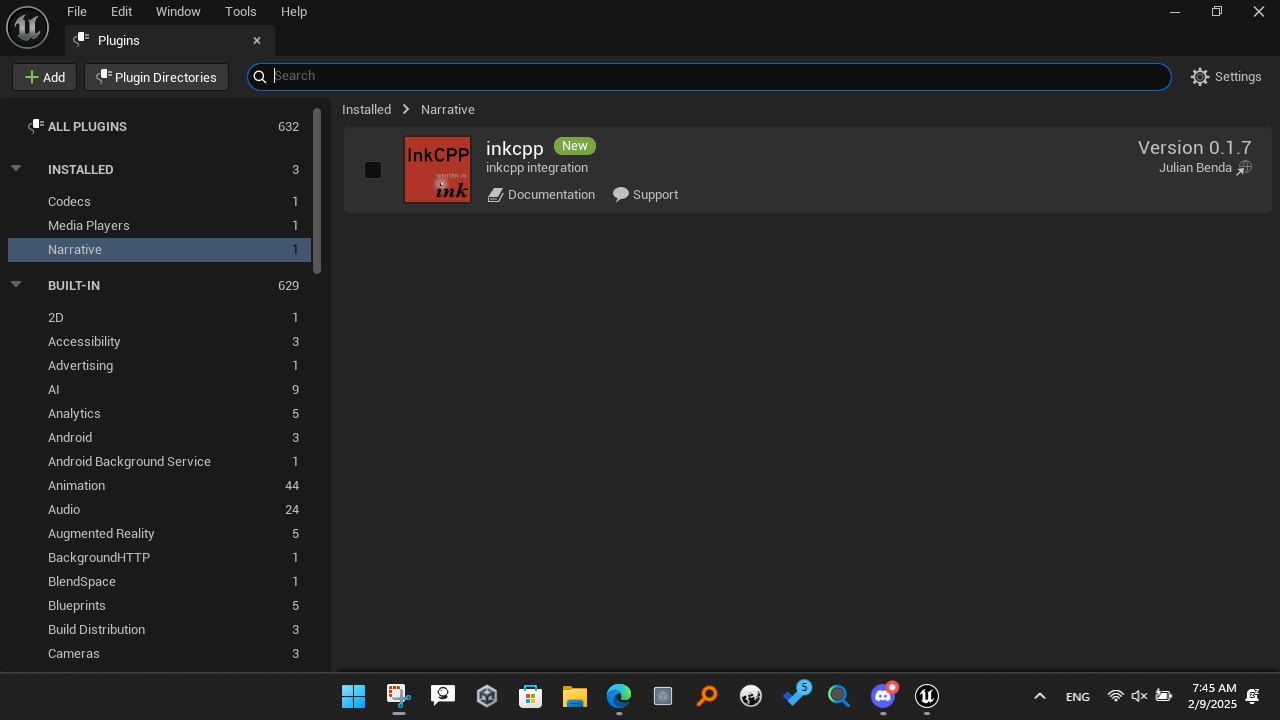
Go to Edit > Plugins to invoke the Plugins window where the plugins for the current project can be enabled or disabled. Go to Installed > Narrative in the Plugins list and/or use the Search filter to find InkCPP. Check it ON! If it asks you to restart the engine, go ahead and do so.
Loading your Ink story
Once you’re back in the engine, pull up the Content Drawer (typically on the bottom left) and click its Import button. Browse to and select an Ink file. This now exists in the project as an InkAsset.
I’m using the classic Intercept story for this guide. Of course, you can use any of your own!
In order to run our Ink story, we need to add an InkRuntime actor to our level.
To keep this exercise simple, let’s make a new Empty Level. Go to File > New Level and pick Empty Level. Click Create.
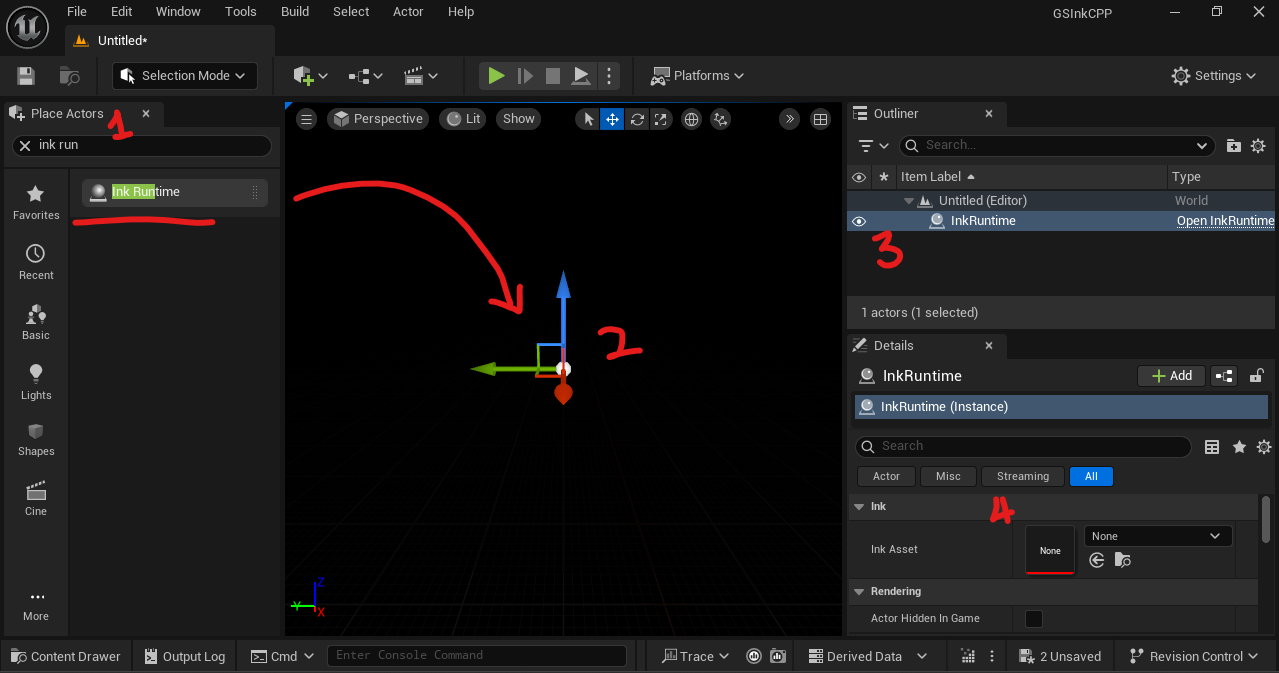
One way of adding the InkRuntime actor is to open the Place Actors window through Window > Place Actors. Here you can search for Ink Runtime and drag and drop the result into the viewport. You can confirm with the Outliner that the InkRuntime actor is in the World. Below the Outliner, in the Details tab, browse to the Ink category and set the Ink Asset to the one we imported earlier. One way of doing this is with the Ink Asset dropdown menu (where it says None). You may also use the Content Browser. Save the level and give it an appropriate name if asked.
Starting the Ink Runtime
To use the Ink Runtime, we will add a simple Blueprint Script component to our actor. This component will access the Ink Runtime and start it. Click the Add button in the Details tab, pick New Blueprint Script Component… from the list and follow the wizard, naming the component InkRunnerComponent. The Blueprint Editor will pop up; if for some reason it doesn’t, right-click the InkRunner component under the InkRuntime instance in the Details tab and pick the Edit option.
The Blueprint Editor is where we can connect nodes to instruct Unreal what to do as opposed to explicitly writing lines of code to do the same. We’re going to ask the InkRunner component to start the InkRuntime. Drag out the white Exec arrow on the right side of the Event Begin Play node till you see Place a New Node and release to bring up the Action List. In order to use the InkRuntime we need to convert the component’s owner from its base Actor to InkRuntime. Type in Cast to InkRuntime and hit enter to drop a node with the same name. It will already be connected to Event Begin Play.
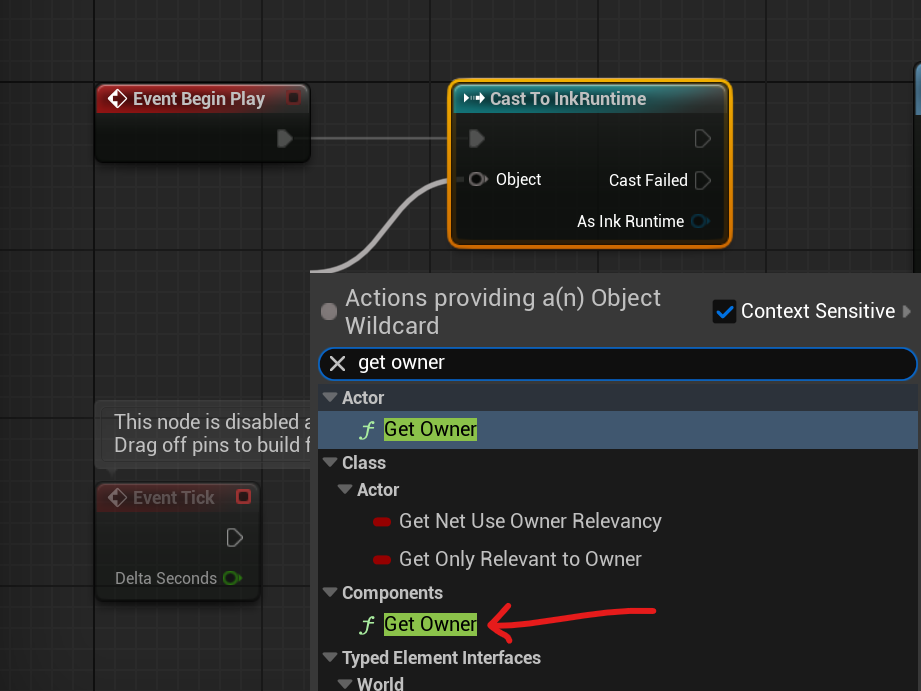
Right-click the Object pip and drag out and release to bring up the Action List again. Type in Get Owner and you’ll see a couple of entries; you want the one under Components not Actor.
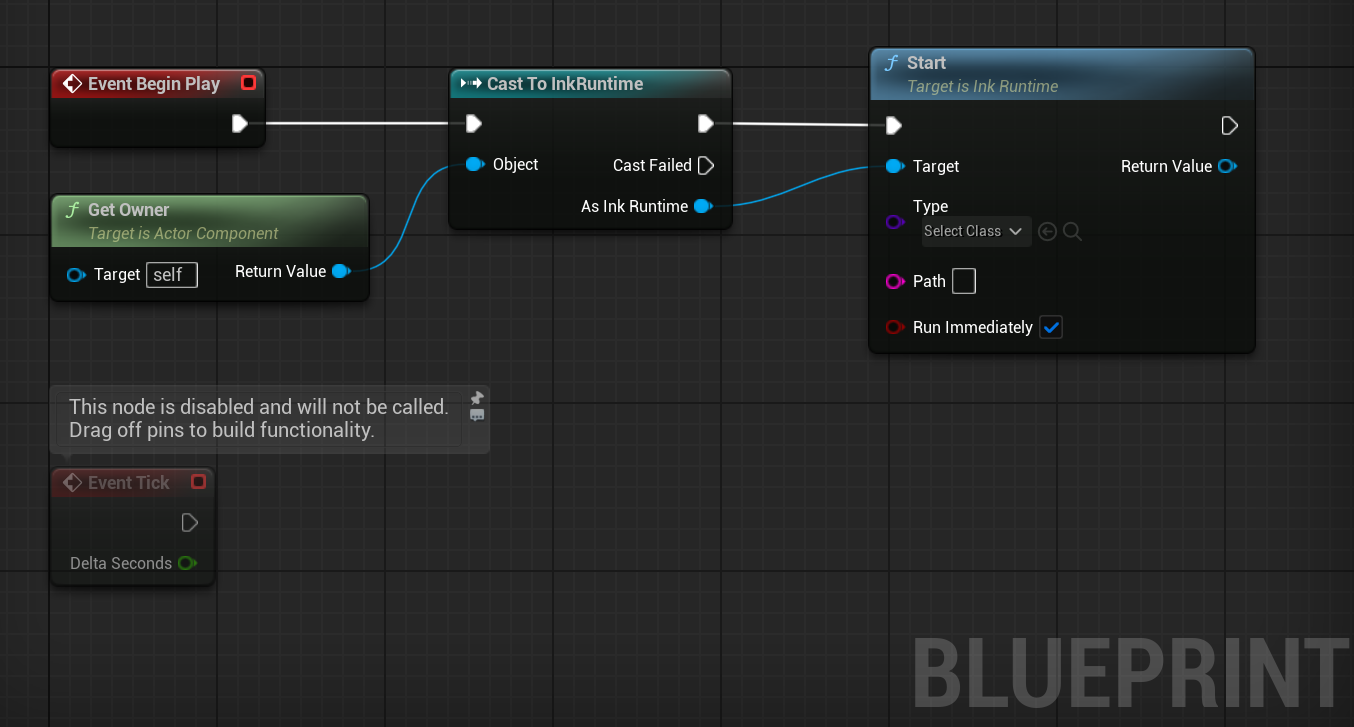
Grab the As Ink Runtime of the Cast to InkRuntime node, type in Start, and hit Enter. This will add and connect the Start node. If it didn’t already do it, make sure to connect the Exec pin of the Cast node to the Start node. When all is said and done, the network should look like this.
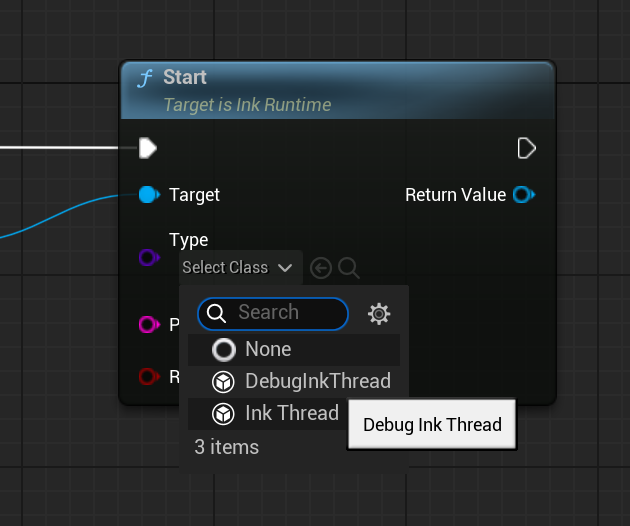
The Start node makes a new InkThread but in order to get the story content and choices from it we need to make a custom InkThread. This may change in the future but for now we need to make a new Blueprint Class with its parent class set to InkThread.
Setting up a Debug InkThread
Open up the Content Browser, click its Add button, and select Blueprint Class under Create Basic Asset. This will open up the Pick Parent Class modal; in here, expand All Classes and search for InkThread. Select it. You will see New Blueprint in the Content Browser. Rename it to DebugInkThread. Back in the Blueprint Editor, take the Start node and set the type to the Blueprint Class we just made.
We will now modify our DebugInkThread class to print out content to the Output Log. Open it in the Blueprint Editor (by double-clicking it in the Content Browser). Move over to the My Blueprint tab and find the Override Function dropdown; open it to find a list of possible Events we can implement in this Blueprint.
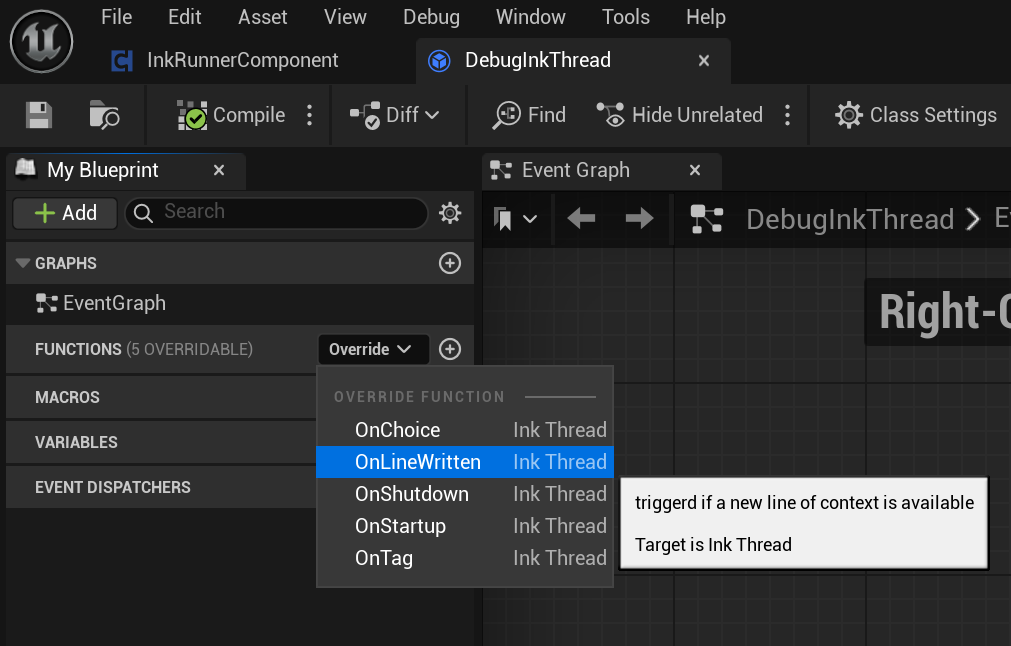
Pick OnLineWritten and notice the addition of the Event OnLineWritten node. Add and connect a Print String node.
Save your work and hit the green Play button. You might see the first line of your Ink story flash on the viewport. You can also open the Output Log (next to the Content Drawer at the bottom of the default layout) and find the printed statements.
InkCpp: Display: Loaded Ink asset
InkCpp: Display: Start
LogBlueprintUserMessages: [None] The bedroom. This is where it happened. Now to look for clues.
Working with Choices
We will print the choices next. Setup a for-each loop and use it to make a string that outputs the choice number followed by the choice text. See below for more details; you can right-click to pan the blueprint.
The output now looks like
LogBlueprintUserMessages: [None] The bedroom. This is where it happened. Now to look for clues.
LogBlueprintUserMessages: [None] 1: The bed...
LogBlueprintUserMessages: [None] 2: The desk...
LogBlueprintUserMessages: [None] 3: The window...
To reduce the scope of this exercise, we will avoid handling Unreal Input and just programmatically pick the first available choice. We can do this by running a Pick Choice node when the for-loop is completed. However, this would occur instantly so we’ll utilize a Timer.
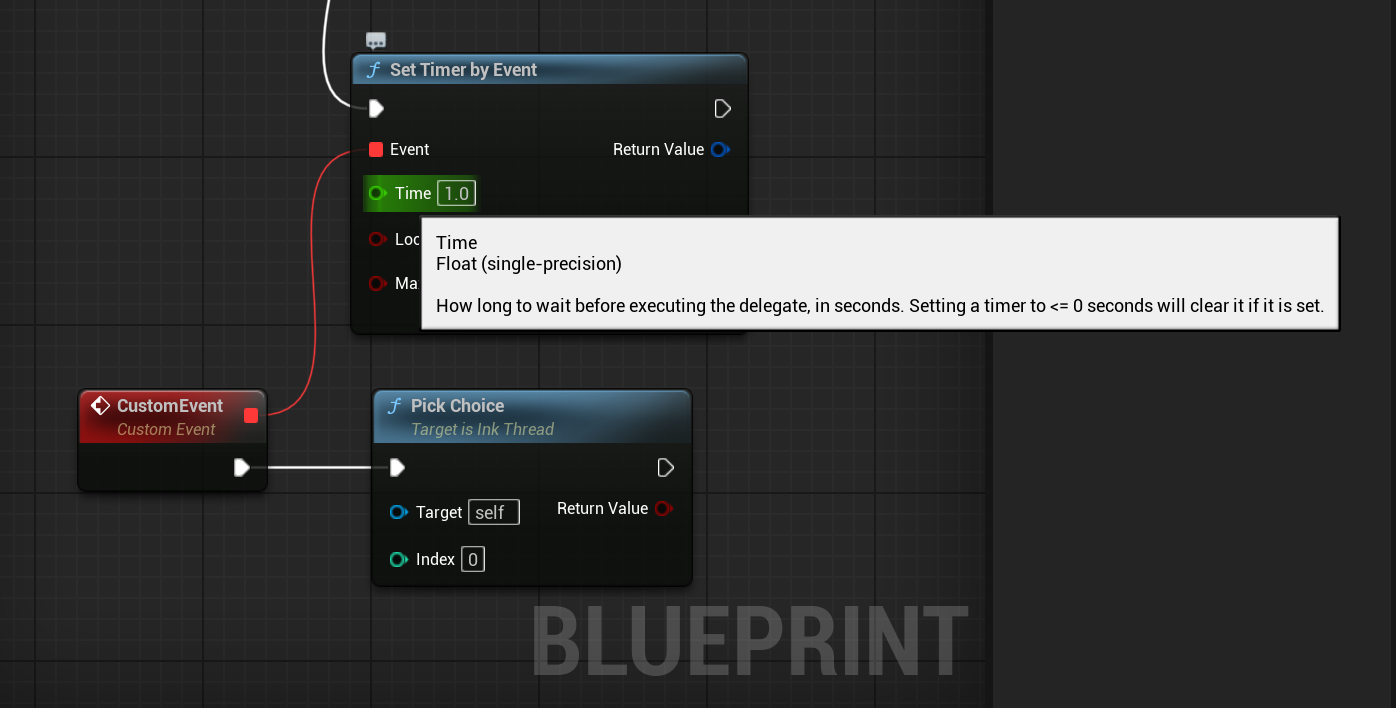
Drag the Completed Exec arrow and add a Set Timer by Event node. In this node, drag the Event box and click Add Custom Event under Add Event. Leave the name as CustomEvent and add the Pick Choice node to it. Finally, set the Time to 1.0 seconds. Save and play.
You should now see the Output Log spit out the Ink content. Right after a group of choices are displayed, the first choice will be selected and the story will continue till the end is reached. At this point, you will see
InkCpp: Display: Destroying thread
Of course, we don’t have to stick with selecting the first choice each time. We can pick a random index from the Choices array and use that. For better readability, we can also print the choice we selected.
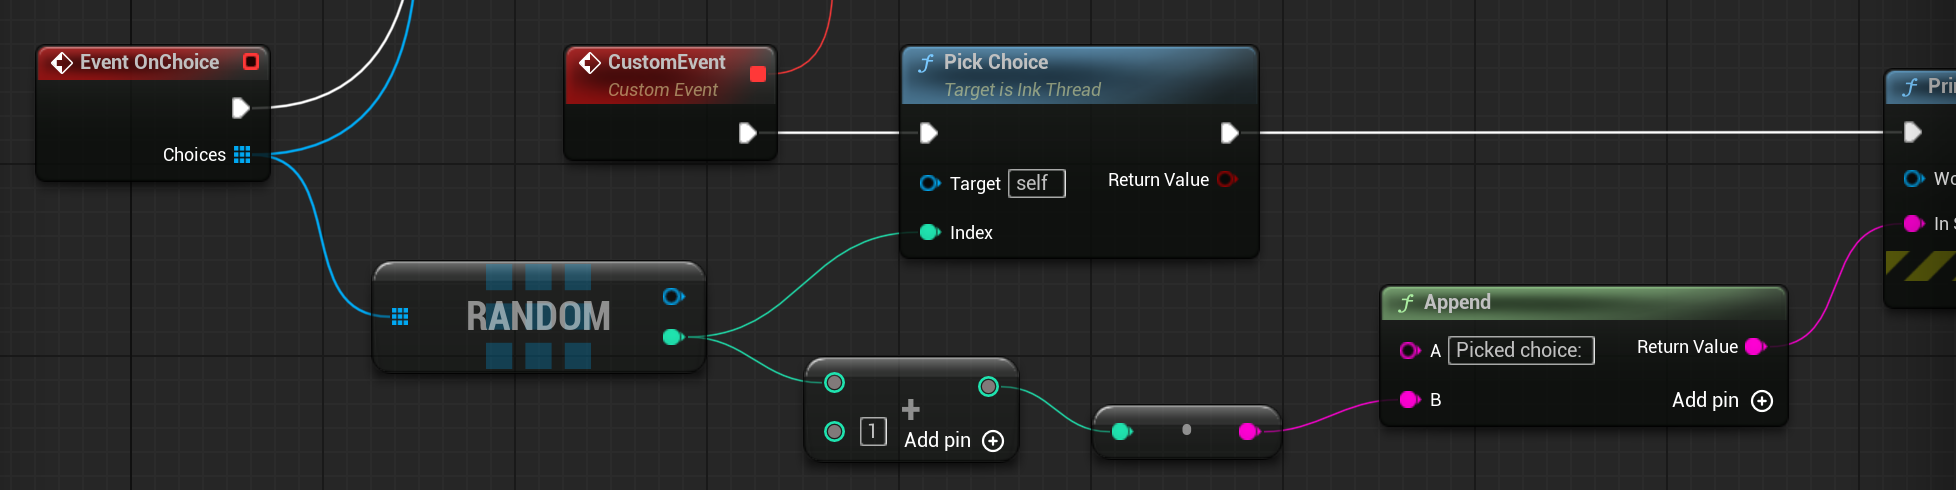
The following log shows the above random selection in action.
LogBlueprintUserMessages: [None] As Harris speaks I find myself suddenly sharply aware, as if waking from a long sleep. The table, the corrugated walls of the hut, everything seems suddenly more tangible than a moment before.
LogBlueprintUserMessages: [None] Whatever it was they put in my drink is wearing off.
LogBlueprintUserMessages: [None] 1: Yes
LogBlueprintUserMessages: [None] 2: No
LogBlueprintUserMessages: [None] 3: Tell the truth
LogBlueprintUserMessages: [None] 4: Lie
LogBlueprintUserMessages: [None] Picked choice: 2
LogBlueprintUserMessages: [None] "Yes. I suppose he was their agent. I should have realised but I didn't. Then he threatened to tell you. I thought you would have me locked up: I couldn't bear the thought of it. I love working here. I've never been so happy, so successful, anywhere before. I didn't want to lose it."
LogBlueprintUserMessages: [None] "So what did you do with the component?" Harris talks urgently. He grips his gloves tightly in one hand, perhaps prepared to lift them and strike if it is required. "Have you passed it to this man already? Have you left it somewhere for him to find?"
LogBlueprintUserMessages: [None] 1: I have it
LogBlueprintUserMessages: [None] 2: I don't have it
LogBlueprintUserMessages: [None] 3: Lie
LogBlueprintUserMessages: [None] 4: Tell the truth
LogBlueprintUserMessages: [None] Picked choice: 4
Parting Words
And this concludes how we can use InkCPP in Unreal. We’ve seen how we can set an InkRuntime actor to load an imported Ink file and how we can use InkThreads to navigate the story content.
An actual project would drive various decisions for how we’d set things up; we would have to go beyond our DebugInkThread setup and build functional User Interfaces and proper Input handling. Whatever the needs of the project, InkCPP for Unreal can handle your Ink stories. It is robust and supports Ink tags, external functions, snapshot save-states and more. We’ll explore some of these in a future guide.